It's a rainy, rainy Monday afternoon. Both babies are napping, as should I be, but I wanted to jot down my new go-to for a pie crust before I forget:
Makes 1 pie
1/2 cup shortening
1 1/2 cups flour
1/2 teaspoon salt
Water
With your fingers, crumble the shortening into the flour and salt until it resembles coarse cornmeal.
Do not overwork.
Add water - it works better very cold, but that's not necessary - until desired consistency.
Roll out onto floured surface.
Showing posts with label Pre-preparation. Show all posts
Showing posts with label Pre-preparation. Show all posts
Monday, November 25, 2013
New Pie Crust Recipe
Wednesday, April 4, 2012
An Ode to the Double-Yolked
A good friend of ours has a local connection for double-yolked eggs. Mike was intrigued: "How do they know they're double-yolked before they make it to the grocery shelves?" Shining a light behind the egg itself will allow you (or whatever machine in the factory) to see the status of what's going on in there. "Why would you care if your eggs have one yolk or more?" See below...
Though perhaps a little higher than cholesterol than the everyday Kroger egg, they. Are. Fabulous. Generally brown and larger than a large egg, these babies pack a HUGE wallop in your baking; chocolate chip cookies are especially tender and delicate, and you just haven't lived until you've had a double-yolked brownie. I'm honestly not sure why one cannot purchase them at the grocery store.
Actually, I do know: lots of folklore and superstition swirl around the ordinary double-yolked egg. Daisy believed that it meant good fortune or that a wedding was around the corner, C.J. associated them with the devil on your doorstep. I suppose it has to do with your family and where you were brought up. Having grown up on a farm, I have to steel myself just a little every time I crack one open, lest there be a beak or feathers or even a little blood (eek) in there. Now THAT definitely makes you feel like the devil's right behind you. Especially when they also sell chicken feet at the Pig for voodoo rituals.
But they are are fun to hunt.

Monday, January 18, 2010
Streusel Muffin Topping
I absolutely adore muffin tops. The ones on actual muffins, that is. I was a married woman before I learned the alternate definition of a muffin top, and if you don't know what one is, go ask a frat boy.
Sounds like I married a frat boy, doesn't it?
Anyway, my absolute favorite, most irresistible sort of topping for a muffin is the streusel variety. It goes well on any sweet muffin you can imagine and gives it a crunchy finish that has me coming back for more.
2 Tablespoons all-purpose flour
5 Tablespoons white or brown sugar
1/2 teaspoon ground cinnamon or spice of your choice
Finely chopped pecans (optional)
2 Tablespoons shortening
- Mix dry ingredients together in a medium-sized bowl.
- Cut the shortening in with a fork until it has a sandy texture.
- Sprinkle over muffins and gently press into dough just before putting them in the oven.
Photo courtesy of Taste of Home.
Thursday, December 10, 2009
Green Garlic and Roast
I don't know about you, but at a certain point after Thanksgiving, I decide that if I have to eat one more bite of something that had feathers in its lifetime, I will scream.
SCREAM.
I do love turkey - don't get me wrong - but sometimes a girl just needs some good old red meat. So I decided to make one of my favorites, an English Roast. I sliced the onion, I peppered the meat. I chopped the garlic and mixed it with the wine, vinegar, and spices. I carefully stacked the meat on top of the onions, poured the liquid and garlic on top, set the timer, and went on about my day.
About two hours later I decided to give it a check, and I could tell there was something odd even through the condensation on the lid. The meat was speckled with bits of green.
GREEN.
I mean SUPER GREEN.
Belongs in a salad GREEN.
WHAT THE HELL DID I DO TO THAT MEAT?!?
After the initial panic subsided, I realized that the green was actually the garlic. The smell was good. The taste was good. Still. Ugh. It looked awful. Like the green cheese grits that Mom makes every St. Patrick's day that taste absolutely awesome but you have to eat them with your eyes closed because part of you sincerely believes they've molded.
So I looked it up on the internet.
According to WikiAnswers, immature chopped garlic will sometimes turn green when exposed to air, copper, or acidic liquids like vinegar. It is perfectly safe to eat, just a terribly unappetizing color. To fix the green-ness, you can cook the hell out of it (which I did), and eventually the color will go back to normal. Or to prevent the color altogether, store your garlic at room temperature for four weeks or more to allow it to completely mature before using it in dishes.
According to WikiAnswers, immature chopped garlic will sometimes turn green when exposed to air, copper, or acidic liquids like vinegar. It is perfectly safe to eat, just a terribly unappetizing color. To fix the green-ness, you can cook the hell out of it (which I did), and eventually the color will go back to normal. Or to prevent the color altogether, store your garlic at room temperature for four weeks or more to allow it to completely mature before using it in dishes.
It's true-blue, old-school food coloring.
So use your old garlic first. Except on St. Patrick's Day.
Photo courtesy of David Rusling.
Friday, November 20, 2009
Where Have I Been?
My dearest, most darling readers. I do apologize for the impromptu hiatus from my normal blogging activities. To tell the truth, I've been busy: housewifery and CPA-ness isn't all calculators and bon-bons, you know. A good friend reminded me that it had been a long time since my last post with the gentle nudge of, "ARE YOU DEAD?"
I didn't know you cared.
Just a few of the things I've been doing of late. But I wasn't smiling goofily all the time. Don't you love how deviant she looks in the bottom left picture of cleaning the sink?
It hasn't been all the normal house and work tasks that have kept me so busy. Mike and I both had BIG birthdays in the past two weeks. And we had a great time celebrating them with family and friends. Hell, we're continuing the celebration with a dinner tonight with lovely friends.
Dante has passed his first level of what I like to call Puppy Class: How to Be A Puppy. Actually, it's a lot more involved than "Wag your tail!" "Give me kisses!" He has passed the first of three necessary stages to become a therapy dog, meaning that he and I are that much closer to being able to visit hospitals, nursing homes, and the like to bring some sunshine to others' lives. I used to do this a lot with my veterinarian grandfather in Canton, Mississippi, but regulations bave since become much more stringent. Meanwhile, Saylor down the street discovered that Dante very much likes leaves. Hold a dry one out as if you're going to feed it to him, and he barks and lunges at it while wagging all over.
Dante and I have also started going to watch Mike's soccer games on Sunday evenings. I take a lawn chair and some hot chocolate while Dante takes his little soccer squeaky ball. The SQUEAKY SQUEAKY SQUEAKY isn't so bad when he's outside, so he plays to his heart's content while I watch my hot man on the field. I have been up to my elbows in dirt in the yard. Mom gave me 100 jonquil bulbs for my birthday, which I promptly put in the front flower beds while Mike washed and waxed vehicles last weekend. I have also almost completed the final harvest, pictured below, cleaned out the beds, and cleaned off the tomato cages to give so my good friend Laura so she can make Christmas trees out of them. It just doesn't get much more Southern than that. Next year I think I'll plant on the north side of the yard so my sasanquas don't get so choked out.

My chapter of the DAR kept me busy last week as a hostess for one of our coffee/tea meetings. I baked choclate pound cake with amaretto whipped cream and divinity while my other sisters brought nuts and cheese straws. The program was about Native American jewelry and featured the extensive collection of my friend Anna. My Little Rock grandmother would have been in heaven - she loves turquoise and pieces like that. There was even a squash blossom necklace made of buffalo nickels.
The house has been turned upside down for fall and winter. I have rotated dishes to my winter and Christmas sets, laundered and ironed tablecloths and corresponding linens, brought out the runner carpet in the back hall to warm it up, flipped mattresses, changed sheets, and pulled out and laundered the warm bed linens.
I have been making cinnamon rolls with buttermilk instead of regular milk for even more decadence, brownies with a teaspoon of nutmeg and ground cloves, oatmeal cookies with chocolate chunks instead of raisins, pot roast, chicken pot pie (thanks for the inspiration, Linda!), and other comfort foods that keep us warm.
Christmas cards and gifts have been ordered, celebrations have been planned, RSVPs sent, recipes dusted off, crystal and sterling polished, closets organized, and leaves picked up. Slowly but surely, we are getting ready.
Just call me Martha.
 Housewife photo courtey of Laughing Yaffle.
Saturday, July 25, 2009
Pear Chutney

Remember Cindy's yard with the pears? And the dogs who loved them? We were able to glean a bushel of pears. In spite of the dogs, that was the easy part: the hard part was finding a recipe suitable for them!
The winning recipe was this pear chutney from Worth Savoring: Literary, Visual, and Culinary Creations from the Hills of North Mississippi by the Union County Historical Society - New Albany, Mississippi.
25 large, firm pears
1 pound dark raisins
1 Tablespoon ground ginger
1 Tablespoon ground cloves
1 Tablespoon ground cinnamon
8 small, green, hot peppers
1 1/2 pints cinder vinegar
5 pounds sugar
2 cloves garlic
1/4 cup salt
2 cups pecans

- Mix sugar and vinegar in very large pot in which you'll boil chutney.
- Peel and slice pears.
- Remove seeds from peppers and grind.
- Grind garlic.
- Mix well with spices (stir - do not mix with blender).
- Put all except for nuts in the pot with sugar and vinegar; stir.
- Keep nuts out until last.
- Boil for 30 minutes and add nuts the last 15 minutes.
- Pack in sterilized jars and seal.
Worth noting: this is wonderful served over cream cheese for an appetizer spread or is a delightful condiment for chicken or pork.
Be careful with those hot peppers. I used some mature jalapenos out of the backyard, and though they have made my hands sting a little bit before, I developed some pretty bad chemical burns this time. They stung and burned for about 7 hours after I was done with the chutney. I should've used gloves!

Wednesday, July 15, 2009
Canning....
 Is not for the faint of heart. Thanks to Cindy's garden, we were inundated with all sorts of fabulous fruits and vegetables. So I decided to preserve some of them for later. Nothing's better than coming in from a cold January day and opening a can of fresh summer 'maters.
And as I type this, I just now realized, as a full-grown adult, that in home canning, you don't use cans. You use jars. So why the hell do we call it canning? Because that's just what it's always been called.
In case you haven't seen your grandmother do it, basically, you sterilize in boiling water (NOT the dishwasher, even if you have an antibacterial cycle. I do both just in case.) everything that will come into contact with the food: jars, rims, lids, thermometer, a funnel, tongs, jar holders, measuring cups, everything. Fill the jars with acidic fruit or cucumbers with vinegar to pickle, put on the lids and rims, and process them in a vat of boiling water to create a vacuum seal against stuff like botulism. Mom's 1934 edition of the Joy of Cooking even says that the canning process has been largely abandoned, but if my grandmother could do it, then by golly, so can I. (No pun intended.)
And anyway, just like something you buy at the grocery store, if the button on the lid pops up after sealing and before you open it, DO NOT EAT IT. Simple.

Here are some sweet bread & butter pickles just after I put them in. Just incorporating the room temperature jars will briefly bring down the water temperature, but it comes back up pretty quickly. It's an interesting study in thermodynamics.
 Did I mention it's super-hot work? It was 90.3 degrees IN THE KITCHEN! I opened all the windows and found myself really enjoying the cool 84.9 degree breeze from outside.
 Did I mention it's super-hot work? It was 90.3 degrees IN THE KITCHEN! I opened all the windows and found myself really enjoying the cool 84.9 degree breeze from outside.
Friday, June 19, 2009
Grilled Toast

Part of this blog's reason for being is to record my triumphs and (usually spectacular) failures in the kitchen. I haven't yet shown the "my cup runneth over" chocolate pound cake because it makes me so mad every time I make it. It's to do with both the type of flour I'm using and the fact that I keep putting extra goodies in it. I've gone so far as to write, "TOO DAMN BIG FOR CHA-CHA'S BUNDT CAKE PAN," in pen in my favorite cookbook, over which I'm sure the generations to come will laugh.
But I digress.
Most of theses dishes are completely experimental, meaning I'm sitting on the couch thinking, "Hmm.... I like bacon. And I like corn. Let's try them together!" And if it's good enough to remember, I have to put it up here so I can look back to it myself. That being said, I in no way mean for this post to be patronizing, but Mike and I didn't even know you could make toast on the grill. Yeah, fire + bread = toast, but who thinks like that anyway? Light dawns on yonder brow.
Back to Mayberry? Yeah, try back to the Copper Age.
So planning ahead, I knew I would be grilling steaks to go with my bruschetta last night, and I figured it was a shame to waste all that good hot grill space when I had toast to make too. So here's what I did:
- Go buy a loaf of Italian or French bread. You can most likely get your baker to pre-slice it for you, but I forgot to ask mine to do it on the diagonal to make it more authentic.
- With a pastry brush, brush both sides with olive oil.
- Rub with fresh garlic.
- Follow with some freshly-cracked pepper.
- Lay it out on the grill, usually close to the hottest part until brown.
- Flip.
This exercsise is also a GREAT way to find out exactly which spots on the grill are hotter than others. For instance, I learned that the back of our grill is much more warm than the front, which stands to reason with how our grill top opens. And I didn't burn any pieces to a crisp or have to pull out the fire extinguisher. Cha-Cha would be proud.
Saturday, May 16, 2009
How to Peel a Tomato
It's another beautiful spring weekned, and I wanted to suprise Mike with his favorite side: homemade salsa! It's also known as ugly dip, but I figure when I individually chop the ingredients it's salsa, instead of when I get lazy and just throw it all in the blender/Cuisinart.
These are early vine-ripened tomatoes, so they're pretty small. I didn't want to peel them with a knife because 1. it takes so long and 2. it inherently takes some of the tomato meat with it. So I figured I'd blanch them. You have probably already heard of this process, but it was my first time, and I was really pleased with the results.
You'll need a pot of boiling water, a bowl with ice water, tongs, and tomatoes.
Core the tomatoes by just removing the little hard patch at the top where it connects to the stem. Place the tomatoes in the boiling water for 15-25 seconds. Suprisingly, it does not cook them!  Watch carefully, and you'll see the skin begin to split. That's when you dunk them in ice water.
 You can use a knife to get the skin started, but really, it pulls off suprisingly easily.
 This tomato has no peel! Check out how much meat was saved versus knife-peeling.
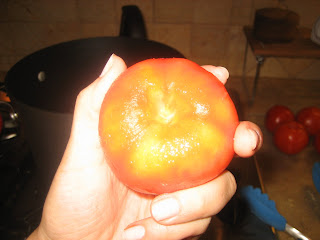 Voila - peeled tomatoes, ready for the salsa!

Monday, February 16, 2009
Would-Be Gardener

After the war, my grandfather in Arkansas was a farmer. I remember traveling through the Delta as a little girl, making notes on the status of soybeans, corn, and cotton, and counting the number of sections on irrigation systems so I could give him a full report once we arrived in Morriliton. To this day, cotton that's two feet high means that school's around the corner. Along with crops, Grandpapa raised the most beautiful cows, and we still have a little farm out from Menifee, which I love to visit.
I suppose then that there is a genetic explanation for my lethargic love of dirt. The smell, the feel, the simple nuturing vitamins emanating from a spongy, dark clod of dirt is as good for me as a cup of coffee and a pound of dark chocolate.
I'm not saying I'm a GOOD gardener.... Just that once I get into it, it's a good day.
My stepmother, now SHE's a great gardener. As long as I've known her, she has engineered exquisite creations both inside and outside the house, in dirt, pots, vases, whatever she touches works beautifully. I remember once she'd worked all afternoon on quail herbed from her own garden. My sweet little sister was about 2 years old. She took one bite, looked at me with her big blue eyes, and matter-of-factly said, "This tastes like dirt. I know. I've had it before."
So so here's my attempt at giving food the delectable taste of dirt. The above photo shows my purchases this morning: from the left, two cilantro, four mint (will probably move them into the yard once they grow up and out of the pot), one flat-leaf parsley, and a rosemary.
I love how once they were re-potted, they all took a collective deep, relaxing sigh and seem to like their new homes. It's like they're stretching out and settling in. Kind of the same reaction as I have in the hot tub with Mike and a glass of champagne.
So much for my Valentine's Day manicure.


Sunday, November 16, 2008
Pretzel or Graham Cracker Crust
I'm not sure where I found this recipe. It's not one I made up on my own, but I've seen it in several different places. The idea for pretzel crumbs was mine, though I'm sure others have come up with it before me. I figured, hey, I like salty AND sweet. I bet this would be great at the bottom of a pie. And it remains my favorite crust for key lime pie.
1 cup graham cracker crumbs or pretzel crumbs (a food processor really helps with this!)
3 tablespoons white sugar
5 tablespoons butter, melted
- Preheat oven to 325 degrees F (165 degrees C).
- Mix graham cracker crumbs with sugar and melted butter.
- Press into 9 inch pie plate and bake for 5 minutes.
- Remove from oven and let cool.
Sunday, November 2, 2008
Whipped Cream
The first time I made this as a married woman, Mike's dad Roy was visiting. He almost got his tongue caught in the hand mixer for licking the beaters before I unplugged it.
8 ounces whipping or heavy cream (1 cup, enough to cover a standard pie very well)
2 Tablespoons sugar, more or less to taste
1 teaspoon vanilla
- In a deep bowl (to prevent splashing out) add cream, sugar, and vanilla.
- With a wire whisk attachment (for a standing mixer) or whipping beaters for a hand mixer, beat on high until desired consistency has been achieved. I think it's about 1-2 minutes, but it's safer to watch it and stop the beaters every now and then to check.
- Be careful: if you beat it too long, you'll end up with great homemade butter.
Saturday, November 1, 2008
Chicken and Broth for Pot Pie, Spaghetti, Lasagna, Poppyseed Chicken.... whatever you need cooked chicken for
A CHICKEN IS LIKE A MAN. THE FASTER YOU COOK IT, THE TOUGHER IT IS. LET IT SIMMER, AND IT'S PUTTY IN YOUR HANDS.
Basically, take some raw chicken, put it in a pot with your favorite seasonings (celery salt, onion powder, garlic, paprika, pepper, oregano, thyme, rosemary, whatever), boil it for 30 minutes to an hour, let it cool in the water as long as you want to (but less than 3 hours to prevent bacteria growth), and pick it free of bones, fat, skin, and cartiledge. Then use it in a recipe, refrigerate it, or freeze it.
Basically, take some raw chicken, put it in a pot with your favorite seasonings (celery salt, onion powder, garlic, paprika, pepper, oregano, thyme, rosemary, whatever), boil it for 30 minutes to an hour, let it cool in the water as long as you want to (but less than 3 hours to prevent bacteria growth), and pick it free of bones, fat, skin, and cartiledge. Then use it in a recipe, refrigerate it, or freeze it.
The liquid that's left after you boil a chicken is homemade chicken broth. Drain it, refrigerate or freeze it, and use it in other recipes.
Hmm. The more I typed up there, the more complicated it seems. But really, you can use any part of chicken (except neck and guts) and any seasonings you like. Here are a couple of examples:
For a dish I'm going to serve company or send as a gift I'll use:
1-4 pounds boneless, skinless chicken breast (depending on how much I need for the recipe)
1 Tablespoon salt
1 Tablespoon pepper
1 Tablespoon minced garlic in oil (I keep this store-bought stuff in a jar in the fridge. Don't tell anybody.)
1 Tablespoon celery or onion powder
- Put the chicken and spices in a pot.
- Cover with about 2 inches of water.
- Set it to boil. I let it boil for about an hour.
- Then turn off the heat and let it sit in the water for about an hour to absorb the flavors of the spices.
- Rinse it off, pick off what little fat there is, and shred the meat into smaller pieces.
Or if I'm doing a chicken casserole for Tuesday night, I might go the more economical route and just boil a whole chicken to include both light and dark meat. Mom turns her nose up at the idea of buying, butchering, or dealing with a whole chicken. I figure it's a money saver, and I'm glad to be familar with what I'm eating.
- Be sure to fully thaw the whole chicken either in the refrigerator (slower thaw, more tender meat) or in a sink of moving water (faster thaw, slightly less tender meat).
- The gross part: reach into the chicken and be sure to get out all the guts and the neck. If left in, the guts will turn the water brown and might mess with your flavor.
- Rinse off the chicken, inside and outside, and repeat steps 1-5 above.
- As for picking the chicken, don't be shy. It's dead: it doesn't care. Just jump in there and start pulling off anything that looks like meat.
- There are basically 8 parts of a chicken (2 sets of quarters): 2 breasts (white meat), 2 wings (white meat - what you'd get at Buffalo Wild Wings), 2 drumsticks (dark meat), and 2 thighs (dark meat)
- Put the meat parts in a clean bowl. Bones and fat go in the trash. You'll be suprised how much meat you can pick off a whole chicken.
Yes, boiled chicken is greasy. Take off your rings before you pick it. But it's a FABULOUS skin moistureizer.
Pie Crust
Up until a few months ago, I scoffed at the crazy people who would do a pie crust from scratch. What? Why would you DO that when you can go BUY one at the Kroger just as easy? That's just crazy.
And then I found this recipe in the September 2008 Better Homes and Gardens, and it all made sense. Yet another recipe I follow to the letter.
Ingredients:
1 1/4 cups all-purpose flour
1/4 teaspoon salt
1/3 cup shortening
Cold water
- In medium bowl, stir together all-purpose flour and salt.
- Using a pastry blender, cut in shortening until pieces are pea-size (or smaller).
- Sprinkle 1 Tablespoon cold water over part of the flour mixture; gently toss with a fork to mix.
- Push moistened pastry to side of bowl.
- Repeat moistening four mixture, using 1 Tablespoon of water at a time, until all of the four mixture is moistened.
- Form dough into a ball.
- On a lightly floured surface, use your hands to slightly flatten pastry.
- Roll pastry from center to edges into a circle about 12 inches in diameter, lightly dusting with flour as needed.
- To lie pie in plate, wrap pastry around rolling pin. Unroll into a 9-inch pie plate or pan. Ease into pie plate without stretching the dough. Trim edges of crust to 1/2 inch beyond pie plate. Flute edge as desired.
Notes from personal experience:
If you're going to use this crust for a dessert pie, add about 1/4-1/3 cup powdered sugar to each crust you're making (1/2-2/3 cup for a double crust recipe), according to how sweet you want the crust to be. It's basically a short bread recipe.
Cook this pie crust just like you would a storebought one. If you're pre-cooking the crust for a pudding- or cream-filled pie, don't forget to prick the crust with a fork to vent. And if you use a double-crust recipe, be sure to cut holes in the top to vent.
- For a single-crust cold dessert pie, bake at 450 degrees covered in a double-layer of tin foil for 8 minutes, then take foil off and bake for 4-6 more minutes, until golden brown.
- For a double-crust or other recipe, follow the recipe instructions.
You can double this recipe in the same bowl and just take out what you need, when you need it. It's homemade, so it's not supposed to look perfect.
Latticing a pie is a lot easier than you think it is. Pie dough is strong, and if it breaks, you can hide the break under a lattice. Once you have the bottom crust and filling in the pie and the top crust rolled out to a 12 inch circle, take a knife and slice the crust in about 1 - 1 1/2 inch wide strips. Work from one end of the crust with short strips to the other, with short strips.
- Take your first piece, and lay it along one side of the pie.
- Take up the piece next to it, slightly longer, and lay it perpindicularly (sp? at a 90 degree angle) with the corner on top of the first piece.
- Take up the third, slightly longer, piece. Lay it parallel to the first piece and pick up the second piece to allow it to go underneath.
- And so on and so forth.
- You kind of have to hold your mouth just right to do it the first time, but it gets easier with practice.
- Another benefit to a latticed pie is if you forget liquid (like I did with the chicken broth on the chicken pot pie), you can just pour it into the lattice holes.
I put all the pictures at the bottom so it wouldn't be a hassle to follow the recipe instructions:
2. Using a pastry blender or fork, mix flour, salt, optional sugar, and shortening until pea sized or smaller.

3. Sprinkle water and toss, then push to the side of the bowl.


Roll out to about 12-inch diameter.

Wrap pastry around rolling pin.

And transfer to pie plate.

I'm still not great at edging - I bet you can do better than I can.

Prick bottom with a fork.

Voila.

Subscribe to:
Posts (Atom)


